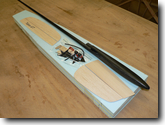
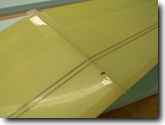
3b. NEW!
This picture shows the new wing servo location. The wing root reinforcement can be seen on this
picture as a diagonal line where the fiberglass doubler ends. The servos must be located inside
of the fiberglass reinforcement patch, behind the spar. The pictures in steps 4-10 show
the previously recommended
servo location and shall not be used for servo location guidance.

| 4.
Start with cutting the servo pockets in the wings. Cut off the mounting lugs from both wing servos.
Use previous step (3b) for proper positioning of the servo. |

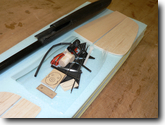
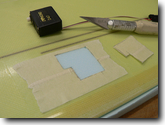
| 5.
Apply masking tape to the skin where the servo pocket will be cut. Trace the servo outline with a pencil. Allow for some space for the servo arm. |
| 6.
Use a sharp X-acto knife to cut the skin. Peel off the piece of the skin. Go around the perimeter of the pocket one more time with the knife to make sure the walls of the pocket are well defined. |

| 7.
Use a wide spade knife to carve the foam out of the pocket. |

| 8.
Use a dremel tool with a routing attachment to finish the pocket to the required depth. Experiment on a scrap piece of foam before working on the wing pocket. |

| 9.
This is what the pocket should look like after you are done. |

| 10.
The servo must be flush with the wing surface or very slightly proud of it. This will help to press the servo down with the tape and create a more positive lock of the servo in the pocket. |

| 11.
Set the servos aside and prepare the wing roots for joining the panels. Remove a thin layer of foam between the spars. This will create a vertical epoxy bridge between the top and bottom spar caps needed to prevent the caps from collapsing into the foam. Important - mark the location of the wire channels on the bottom of the panels. |

| 12.
Make 2 symmetrical half-circle cavities where the attachment bolt hard point will be located, about 125-135mm from the leading edge (near the aileron hinge line). |
| 13.
Tape the two wing halves on the bottom. Notice the marks showing the position of the servo wire channels. This is critical to be able to properly position the wire exit hole later. |

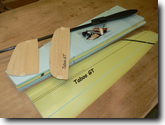
| 14.
This is a good time to check the wing dihedral - 170-190mm from the table with one panel flat on the table. If a small correction is required, use a sanding block to adjust the bevel angle of the wing roots. Very little effort is needed to produce large changes at the wing tip, so be careful not to overcorrect. |

| 15.
Fold the wing panels back to back, tape will hold the bottoms together. Mix some 10-15 minute epoxy with microfibers and/or microballoons to the consistency of a thick mayonaise. |
| |

|